Dec 21, 2011

Sponsor Spotlight - Really Reasonable Ribbon


We really do love ribbon here at LESSology! We are honored to have Really Reasonable Ribbon sponsor Challenge #8 - Frame of Life.

Bonnie Garby is the fabulous owner of Really Reasonable Ribbon. This online store has been meeting the ribbon needs of crafters, wedding planners, rubberstampers, scrapbookers and the artistic community for over 10 years.  They offer great wholesale pricing on full spools of many of their styles, and really reasonable discount retail pricing on ribbon by the yard.

Their large selection of ribbon styles includes a variety of colors and widths in grosgrain, organza, gingham, satin, ric rac, twill tape, velvet, bakers twine, jute and much more.


Here are some fabulous altered projects from the RRR design team.


Fabulous projects! Thank you RRR design team for the wonderful inspiration. If you're still feeling inspired be sure to playing along in LESSology Challenge #8: Frame of Life! The deadline for all entries is Sunday January 8, 11.59pm EST. Please read the challenge rules to ensure your eligibility for our prizes.

Dec 19, 2011

LESSology Challenge #8 Guest Designer: Audrey Frelix


Photobucket

Hello, everyone!  I'm Audrey from Cute and Some and I'm delighted, and so excited, to be a guest designer today on Lessology today.  Thank you Lessology Team for having me!

My project is an altered frame and because I wanted it to represent what I'd like if I purchased a frame --very basic and not too ornate -- here's what I came up with:

This was such a fun, quick, and inexpensive project to put together!  In gathering my materials I found an old 5"x 7" pressboard frame around the house and along with the following scraps I began preparing my altered frame:

5" x 7" sheet of foam board (cut to size for the frame back)
1.50" x 4" piece of foam board (cut for the frame stand)
4" strip ribbon (frame stand hinge)
4.50" x 6" sheet of transparency (for the frame window)
Tulip Permanent Puffy Paint
Gesso


For the frame corners, I cut a strip of 1/2"x4" ArtEmboss Brass Metal (light weight) which I ran through a Cuttlebug embossing folder; then cut the metal lenthwise in half and evenly into fourths across the width.


Next I formed my clay flowers as outlined on the pictures below and baked according to the manufacturers instructions:

With everything assembled I was ready to start!  To give the frame some dimension, using the Tulip Puffy Paint to paint them on,  I miminicked branches and leaves onto the pressboard frame and then allowed it to dry.  Once the paint was dry, I arranged and glued on my flowers to my liking, and painted the entire frame twice with Gesso (letting each coat dry in between)


When the last coat of Gesso was dry, I created the brass corners by folding the metal strips around the corner edges on the front of the frame to the back; next I glued the transparency on the back to cover the window opening, and then glued on the frame back.  For the stand, I folded the strip of ribbon in half lengthwise and glued only one-half of the ribbon to the frame back aligning the bottom of the ribbon to the bottom of the frame.  The remaining half of the ribbon that was not glued down to the frame back is where the stand was glued by laying and gluing an edge (lengthwise)  along the top-side edge of the ribbon (being very careful not to glue down the ribbon to the frame on the side where the stand is attached); this allows the stand to lay flat when not in a standing position.  To finish the back of the frame, I covered it with kraft paper to hide any flaws and painted all the edges.  The pictures below illustrate these steps:


To complete the frame, I painted the flowers using Viva Inka-Gold colors; next,  to age and color the brass corners I used Cranberry color Tim Holtz Alcohol Ink, and finished with Crystal color Stickles to highlight the frame.

All that was left was to pop in the picture!!!

I hope you enjoyed my altered frame, I most certainly enjoyed doing it for you! Again, many thanks to Lessology (love you guys!) and I hope I'll be invited to come back again. Thanks too to all of  you for taking the time to stop by and joining me!!!

Isn't this a fabulous creation? Thank you for sharing Audrey! Please be sure to leave a comment for Audrey.

Hope you are inspired to play along with LESSology Challenge #8: Frame of Life! The deadline for all entries is Sunday January 8, 11.59pm EST. Please read the challenge rules to ensure your eligibility for our prizes.

Dec 16, 2011

LESSology Challenge #7: You've got mail winners!


Winner badge

A big thank you to those who played along with LESSology Challenge #7: You've got mail! :) The winner is   

Charmaine who created this lovely Christmas card and matching envelope! :)


Congratulations Charmaine! You are the winner of LESSology Challenge #7: You've got mail. Please send us an email so that we can make arrangements for your RAK!  [Please grab the winner badge from the sidebar!]

Top 3 badge

And here are the Top 3!


Congratulations ladies! [Please grab your Top 3 badge from the sidebar!] :)


P/s: Don't forget to play along with our current challenge - LESSology Challenge #8: Frame of Life. The deadline for entries is Sunday January 8, 11.59pm EST. Please read the challenge rules to ensure your eligibility for our prizes.

Dec 15, 2011

LESSology Challenge #8: Creative projects of Dora Dekker and Tesa Broman


Photobucket

Are you enjoying the design team showcase for LESSology Challenge #8: Frame of Life? Today we get to see the creative projects of Dora Dekker and Tesa Broman.

Dora Dekker

Hello everyone!!
What a great challenge again, I love old frames and when I see them in a antique shop I need to buy them. Like I did with this beauty.

I painted it white, a fewe layers that's all I did.
Removed the back of the frame, made a little box out of cardstock and placed it behind the frame.
After that I started decorating and as you can see, it looks like an old sewing studio.
Hope you like my altered frame!


Tesa Broman

Hi! I have made a vintage looking altered frame out of an old metal colored frame I got from a flee market for nothing.


I wanted to frame a vintage tag of Santa so I went for a white crackled look by painting the frame with Gesso and then uneaven coat of Antique Linnen Crackle Paint and then a coat of gesso again. Finally I inked the edges with some chalk.


The inner part of the frame has a line of Puffies Cream - like snow... A flower and a few leafs finish it off.


I have the perfect spot for this one on the wall next to our Christmas tree.

Aren't these frames just lovely? We would love to see your altered frames for LESSology Challenge #8: Frame of Life! :) The deadline for entries is Sunday January 8, 11.59pm EST. Please read the challenge rules to ensure your eligibility for our prizes

Please leave a comment for Dora and Tesa! :)

Dec 14, 2011

LESSology Challenge #8: Creative projects of Angi Barrs, Mandy Dodd and Julie Tucker-Wolek!


Photobucket

Today we get to see the creative projects of Angi Barrs, Mandy Dodd and Julie Tucker-Wolek. :)

Angi Barrs

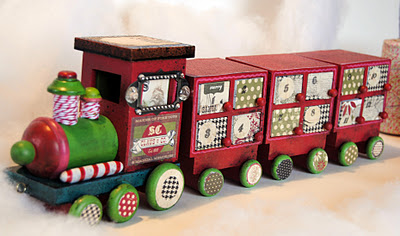
Hello everyone! It's Angi here to share my altered frame creation! And I have a little confession to make. This is not the original altered frame that I made for this challenge. After staring at the original one for hours, I decided that I really didn't like it very much. LOL Have you ever created something and just didn't like the end result?

Here's my frame design re-do! I like this one must better! (smile)


My flowers had missing pearls and brads, so I recycled some and added them to the middle of each bloom. The ribbon that I used was ripped in the middle. I used some extra thread that I had lying around to patch it up for this frame.


The frame is from Ikea and the beautiful paper is from My Mind's Eye. This frame will be under the tree for a good friend of mine! :)

Mandy Dodd

Hi, its Mandy  and I've been creating with a 12x12 decorative edge (or diecut) scrapbooking paper which is mounted on a cardboard backing for strength.  You could use this idea to show off artwork/scrapping page etc with a pretty frame you can hang!

Start with a 12x12 diecut - it needs to be good for cutting out a frame


So following the conture of the decorative edge...

cut out the frame... and measure cardboard to match its size

Paint directly on cardboard OR cover the cardboard with artwork, or scrapping LO

Place foam mounting tape on the underside of the decorative cut-out frame


And here's the end result!
A 12x12 piece ready to be hung
(my youngest dd (15) claimed this already!)


Cant wait to see what you create!
and thanks for looking
xx

Julie Tucker-Wolek

Hi everyone :)

When I saw our altered frame challenge, I decided to take a different twist on it :) I found this on clearance - it's from Plaid Crafts - and as you can see, it looks like they intended it to be a memo board.  Well, I decided to make my own version of a frame from this :)


And here is what I created with it :)  I used Graphic 45's Christmas Emporium line on here :) 


I can't wait to see what everyone creates! :)  ~~Julie :)

Aren't these just awesome projects? We would love to see your take on LESSology Challenge #8: Frame of Life. Please leave a comment for our design team.